Tutorial #2: Installing Spark on Amazon EC2
Synopsis
This tutorial teaches you how to get a pre-built distribution of Apache Spark running on a Linux server, using two Amazon Web Services (AWS) offerings: Amazon Elastic Cloud Compute (EC2) and Identity and Access Management (IAM). We configure and launch an EC2 instance and then install Spark, using the Spark interactive shells to smoke test our installation. The focus is on getting the Spark engine running successfully, with many "under the hood" details deferred for now.
Prerequisites
- You need an AWS account to access AWS service offerings. If you are creating a new account, Amazon requires a credit card number on file and telephone verification.
- You need to create an EC2 Key Pair to login to your EC2 instance.
- You need to import your EC2 Key Pair into your favourite SSH client, such as PuTTY. This allows your SSH client to present a private key instead of a username and password when logging into your EC2 instance.
- You need a general understanding of how AWS billing works, so you can practice responsible server scheduling and you aren't surprised by unexpected charges.
Tutorial Goals
- You will be able to configure, launch, start, stop, and terminate an EC2 instance in the AWS Management Console.
- You will have a working Spark environment that you can use to explore other Sparkour recipes.
- You will be able to run commands through the Spark interactive shells.
Section Links
⇖ Why EC2?
Before we can install Spark, we need a server. Amazon EC2 is a cloud-based service that allows you to quickly configure and launch new servers in a pay-as-you-go model. Once it's running, an EC2 instance can be used just like a physical machine in your office. The only difference is that it lives somewhere on the Internet, or "in the cloud". Although we could choose to install Spark on our local development environment, this recipe uses EC2 for the following reasons:
- EC2 results in a clean and consistent baseline, independent of whatever is already installed in your development environment. This makes troubleshooting easier, and reduces the potential number of environment configurations to worry about in other Sparkour recipes.
- Conversely, your Spark experimentation on an EC2 instance is isolated from your local development work. If you tend to experiment with violent abandon, you can easily wipe and restore your EC2 instance with minimal risk.
- Becoming familiar with EC2 puts you in a better position to work with Spark clusters spanning multiple servers in the future.
If you would still prefer to install locally, or you want to use an alternate cloud infrastructure (such as Google Cloud or Microsoft Azure) or operating system (such as Microsoft Windows), skip ahead to Installing Apache Spark at your own risk. You may need to translate some of the examples to work in your unique environment.
⇖ Configuring and Launching a New EC2 Instance
Creating an IAM Role
First, we need to define an IAM Role for our instance. IAM Roles grant permissions for an instance to work with other AWS services (such as Simple Storage Service, or S3). Although it is not strictly necessary for this recipe, it's a good practice to always assign an IAM Role to new instances, because a new Role cannot be assigned after the instance is launched.
- Login to your AWS Management Console and select the Identity & Access Management service.
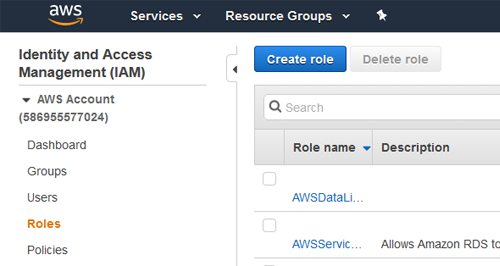
- Navigate to Roles in the left side menu, and then select Create role. This starts a wizard workflow to create a new role.
- On Step 1. Create role, select AWS service as the type of trusted entity. Choose EC2 as the service that will use this role. Select Next: Permissions.
- On Step 2. Create role, do not select any policies. (We add policies in other recipes when we need our instance to access other services). Go to the Next: Tags.
- On Step 3. Create role, do not create any tags. Go to the Next: Review.
- On Step 4. Create role, set the Role name to a value like sparkour-app. Select Create role. You return to the Roles dashboard, and should see your new role listed on the dashboard.
- Exit this dashboard and return to the list of AWS service offerings by selecting the "AWS" icon in the upper left corner.

Creating a Security Group
Next, we create a Security Group to protect our instance. Security Groups contain inbound and outbound rules to allow certain types of network traffic between our instance and the Internet. We create a new Security Group to ensure that our rules don't affect any other instances that might be using the default Security Group.
- From the Management Console, select the EC2 service.
- Navigate to Network & Security: Security Groups and select Create Security Group. This opens a popup dialog to create the Security Group.
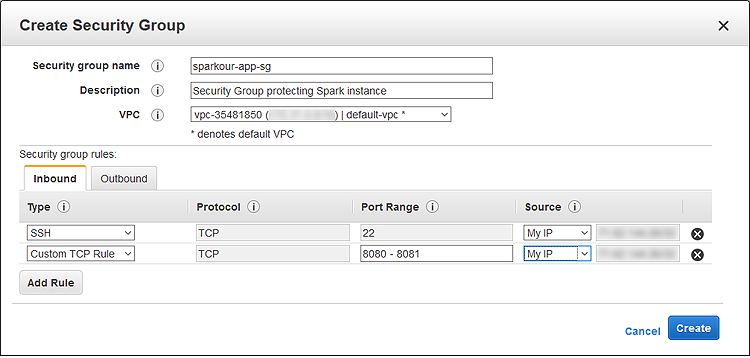
- Set the Security group name to a value like sparkour-app-sg and set the Description to Security Group protecting Spark instance. Leave the group associated with the default Virtual Private Cloud (VPC), unless you are an advanced user and have a different VPC preference.
- Select the Inbound tab and select Add Rule.
- Set the Type to SSH and the Source to My IP. This allows you to SSH into the instance from your current location. If your IP address changes or you need access from a different location, you can return here later and update the rule.
- Select Add Rule and add another inbound rule. Set the Type to Custom TCP Rule, the Port Range to 8080-8081, and the Source to My IP. This allows you to view the Spark Master and Worker UIs in a web browser (over the default ports). If your IP address changes or you need access from a different location, you can return here later and update the rule.
- Your dialog should look similar to the image below.
- Select the Outbound tab and review the rules. You can see that all traffic originating from your instance is allowed to go out to the Internet by default.
- Select Create. You return to the Security Group dashboard and should see your new Security Group listed.
- If the Name column for your new Security Group is blank, click in the blank cell to edit it and set it to the same value as the Group Name. This makes the group's information clearer when it appears in other AWS dashboards.

Creating the EC2 Instance
We now have everything we need to create the instance itself. We select an appropriate instance type from the wide variety of available options tailored for different workloads and initialize it with Amazon's free distribution of Linux (delivered in the form of an Amazon Machine Image, or AMI).
If you want to create new EC2 instances later on, you can start from this section and reuse the IAM Role and Security Group you created earlier.
- If you aren't already there, select the EC2 service from the AWS Management Console.
- Navigate to Instances: Instances and select Launch Instance. This starts a wizard workflow to create the new instance.
- On Step 1: Choose an Amazon Machine Image (AMI), Select the Amazon Linux AMI option. This image contains Amazon's free distribution of Linux (based on Red Hat) and comes preinstalled with useful extras like Java, Python, and the AWS command line tools. If you are an advanced user, you're welcome to select an alternate option, although you may need to install extra dependencies or adjust the Sparkour script examples to match your chosen distribution.
- On Step 2: Choose Instance Type, select the m5.large
instance type. This is a modest, general-purpose server with 2 cores and 8GB of memory that is sufficient for our
testing purposes. In later recipes, we discuss how to profile your Spark workload and use the optimal
configuration of compute-optimized or memory-optimized instance types.
Be aware that EC2 instances incur charges whenever they are running ($0.096 per hour for m5.large, as of March 2020). If you are a new AWS user operating on a tight budget, you can take advantage of the Free Tier by selecting t2.micro. You get 750 free hours of running time per month, but performance is slower, and you'll lose the ability to run applications with multiple cores.
Select Next: Configure Instance Details after you have made your selection. - On Step 3: Configure Instance Details, set IAM role to the IAM Role you created earlier. Toggle the Enable termination protection checkbox to ensure that you don't accidentally delete the instance. You can leave all of the other details with their default values. Select Next: Add Storage.
- On Step 4: Add Storage, keep all of the default values. Elastic Block Store (EBS) is Amazon's network-attached storage solution, and the Amazon Linux AMI requires at least 8 GB of storage. This is enough for our initial tests, and we can attach more Volumes later on as needed. Be aware that EBS Volumes incur charges based on their allocated size ($0.10 per GB per month, as of March 2020), regardless of whether they are actually attached to a running EC2 instance. Select Next: Tag Instance.
- On Step 5: Tag Instance, select Add Tag and create a new tag with the key, Name, and a value like sparkour-app. You can assign other arbitrary tags as needed, and it's considered a best practice to establish consistent and granular tagging conventions once you move beyond having a single instance. Select Next: Configure Security Group.
- On Step 6: Configure Security Group, choose Select an existing security group and pick the Security Group you created earlier. Finally, select Review and Launch.
- On Step 7: Review Instance Launch, select Launch. The instance is
created and starts up (this may take a few minutes). You can monitor the status of the instance from the EC2 dashboard.
Important: You are now incurring continuous charges for the EBS Volume as well as charges whenever the EC2 instance is running. Make sure you understand how AWS billing works.
Managing the EC2 Instance
To help avoid unexpected charges, you should stop your EC2 instance when you won't be using it for an extended period. EC2 charges are incurred whenever an instance is running, and costs round up to the nearest hour. EBS charges are incurred as long as the EBS Volume exists, and only stop when the Volume is terminated. You don't need to perform these actions now, but make sure you locate the necessary commands in the EC2 dashboard so you can manage your instance later:
- To start or stop an EC2 instance from the EC2 dashboard, select it in the table of instances and select Actions. In the dropdown menu that appears, select Instance State and either Start or Stop. No EC2 charges are incurred while the instance is stopped, and all of your data will still be there when you start back up.
- To permanently terminate an EC2 instance, select it in the table of instances and select Actions. In the dropdown menu that appears, select Instance Settings and Change Termination Protection. Once protection is disabled, you can select Instance State > Terminate from the Actions dropdown menu. Terminating an EC2 instance also permanently deletes the attached EBS Volume (this is a configurable setting in the EC2 Launch wizard).
Connecting to the EC2 Instance
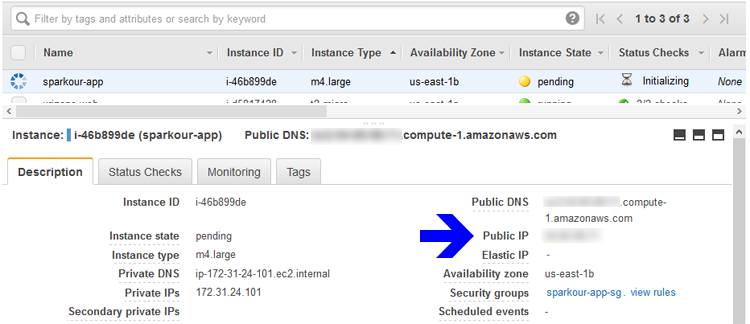
- While the EC2 instance is starting up, select it in the dashboard. Details about the instance appear in the lower pane, as seen in the image below.
- Record the Public IP address of the instance. You use this to SSH into the instance, or access it via a web browser. The Public IP is not static, and changes every time you stop and restart the instance. Advanced users can attach an Elastic IP address to work around this minor annoyance.
- Once the dashboard shows your instance running, use your favorite SSH client to connect to the Public IP as the ec2-user user. EC2 instances do not employ password authentication, so your SSH client needs have your EC2 Key Pair to login.
- On your first login, you may see a welcome message notifying you of new security updates. You can apply these updates with the yum utility.

⇖ Installing Apache Spark
Downloading Spark
There are several options available for installing Spark. We could build it from the original source code, or download a distribution configured for different versions of Apache Hadoop. For now, we use a pre-built distribution which already contains a common set of Hadoop dependencies. (You do not need any previous experience with Hadoop to work with Spark).
- In a web browser from your local development environment, visit the
Apache Spark Download page. We need to generate a download
link which we can access from our EC2 instance.
Make selections for the first two bullets on the page as follows:
Spark release: 2.4.5 (Feb 05, 2020)
Package type: Pre-built for Hadoop 2.7 and later - Follow the link in the 3rd bullet to reach a list of Apache Download Mirrors. Under HTTP, find the mirror site closest to you and copy the download link to your clipboard so it can be pasted onto your EC2 instance. It may not be the same as the link in the example script below. From your EC2 instance, type these commands:
- To complete your installation, set the SPARK_HOME environment variable so it takes effect when you login to the EC2 instance.
- You need to reload the environment variables (or logout and login again) so they take effect.
- Spark is not shy about presenting reams of informational output to the console as it runs. To make the output of your applications easier to spot, you can optionally set up a Log4J configuration file and suppress some of the Spark logging output. You should maintain logging at the INFO level during the Sparkour tutorials, as we'll review some information such as Master URLs in the log files.
Testing with the Interactive Shells
Spark comes with interactive shell programs which allow you to enter arbitrary commands and have them evaluated as you wait. These shells offer a simple way to get started with Spark through "quick and dirty" jobs. An interactive shell does not yet exist for Java.
Let's use the shells to try a simple example from the Spark website. This example counts the number of lines in the README.md file bundled with Spark.
- First, count the number of lines using a Linux utility to verify the answers you'll get from the shells.
- Start the interactive shell in the language of your choice.
- While in a shell, your command prompt changes, and you have access to environment settings in a SparkSession object defined in an spark variable. (In Spark 1.x, the environment object is a SparkContext, stored in the sc variable). When you see the shell prompt, you can enter arbitrary code in the appropriate language. (You don't have to type the explanatory comments). The shell responses to each of these commands is omitted for clarity.
- For now, we just want to make sure that the shell executes the commands properly and return the correct value. We explore what's going on under the hood in the last tutorial.
There is no interactive shell available for Java. You should use one of the other languages to smoke test your Spark installation.
There is no interactive shell available for Java. You should use one of the other languages to smoke test your Spark installation.
When using a version of Spark built with Scala 2.10, the command to quit is simply "exit".
⇖ Conclusion
You now have a working Spark environment that you can use to explore other Sparkour recipes. In the next tutorial, Tutorial #3: Managing Spark Clusters, we focus on the different ways you can set up a live Spark cluster. If you are done playing with Spark for now, make sure that you stop your EC2 instance so you don't incur unexpected charges.
Reference Links
- Running the Spark Interactive Shells in the Spark Programming Guide
- How AWS Pricing Works
- Amazon IAM User Guide
- Amazon EC2 User Guide
- Amazon EC2 Instance Types
Change Log
- 2016-09-20: Updated for Spark 2.0.0. Code may not be backwards compatible with Spark 1.6.x (SPARKOUR-18).
Spot any inconsistencies or errors? See things that could be explained better or code that could be written more idiomatically? If so, please help me improve Sparkour by opening a ticket on the Issues page. You can also discuss this recipe with others in the Sparkour community on the Discussion page.